SwiftLint is a great tool to enforce Swift style and conventions. When working with different developers with different levels of experience and different preferences it is hard to keep a consistency in the way the code is written. Furthermore, as a developer, we are quite lazy to check for linting issues every time we commit, so better let a tool and CI do the job for us. Long story short, SwiftLint is a tool to help a team configure some styling rules based on its needs and preferences, and later on, using CI, enforce these rules to the whole development team.
How to install
SwiftLint can be installed using various ways. The easiest way is to install the pre-built package, by downloading the .pkg file from the latest GitHub release. Another easy way is by using Homebrew and running brew install swiftlint. SwiftLint can also be installed using CocoaPods, by adding pod 'SwiftLint' to the Podfile and running pod install.
More instructions and details can be found on the project’s GitHub Page.
Integrate with Xcode
After installing, SwiftLint can be integrated into Xcode (or other editors like AppCode) so that you can get the warnings and errors when building the project and have them displayed in the IDE.
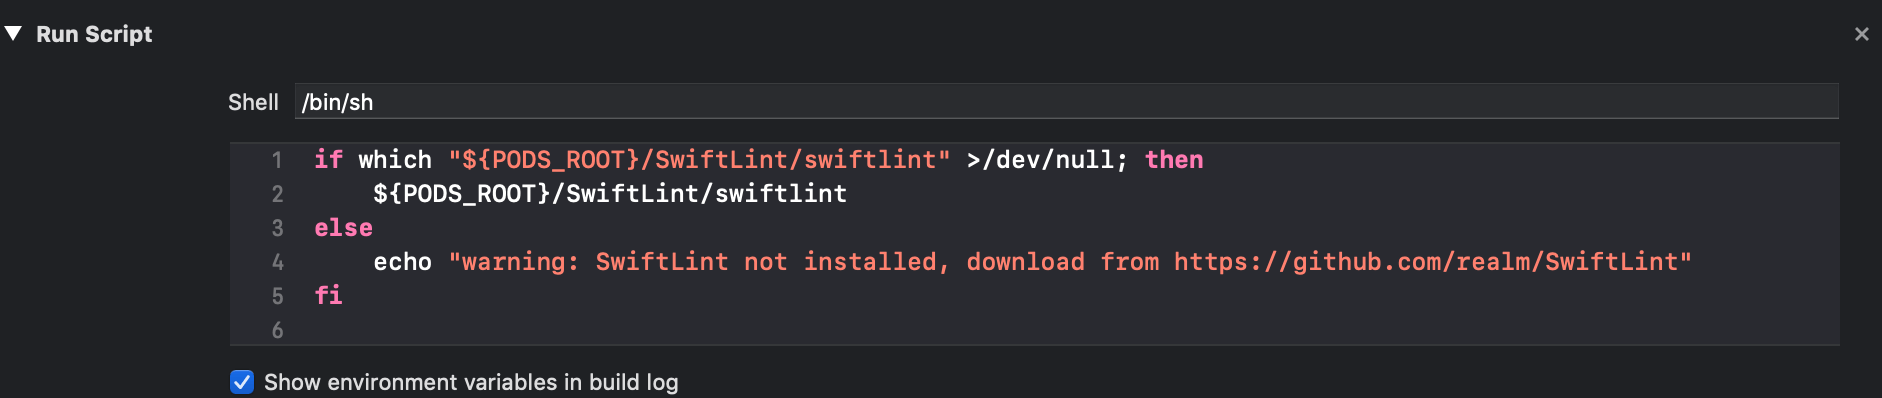
To do so, for Xcode, add a new “Run Script Phase” in the “Build Phases” section. This script should be like the following snippet if the installation is done using CocoaPods
if which "${PODS_ROOT}/SwiftLint/swiftlint" >/dev/null; then
    ${PODS_ROOT}/SwiftLint/swiftlint
else
    echo "warning: SwiftLint not installed, download from https://github.com/realm/SwiftLint"
fi
Integrate with fastlane
You can also integrate SwiftLint with fastlane by adding another lane in the Fastfile, like:
desc "Run linting"
lane :lint do
swiftlint(
  executable: './Pods/SwiftLint/swiftlint',
  mode: :lint,
  strict: true,
  config_file: '.swiftlint.yml',
)
end
Now, you can run fastlane lint and you will get the list of issues.
For more options, you can refer to the documentation.
SwiftLint rules.
After having everything set up, it’s time to configure the rules. SwiftLint offers a plethora of rules and you can use the .swiftlint.yml file to configure them.
Enforcing the length of a line, a file or the body of a function and display some warning when using force casting and force try are some of the simplest but really useful rules, that you can start with. Other rules can be enforcing private IBActions and IBOutlets or throwing an error when using a legacy constructors. To check the full list of the rules that comes with SwiftLint, you can run the command swiftlint rules and choose the rules you want to have in your project.
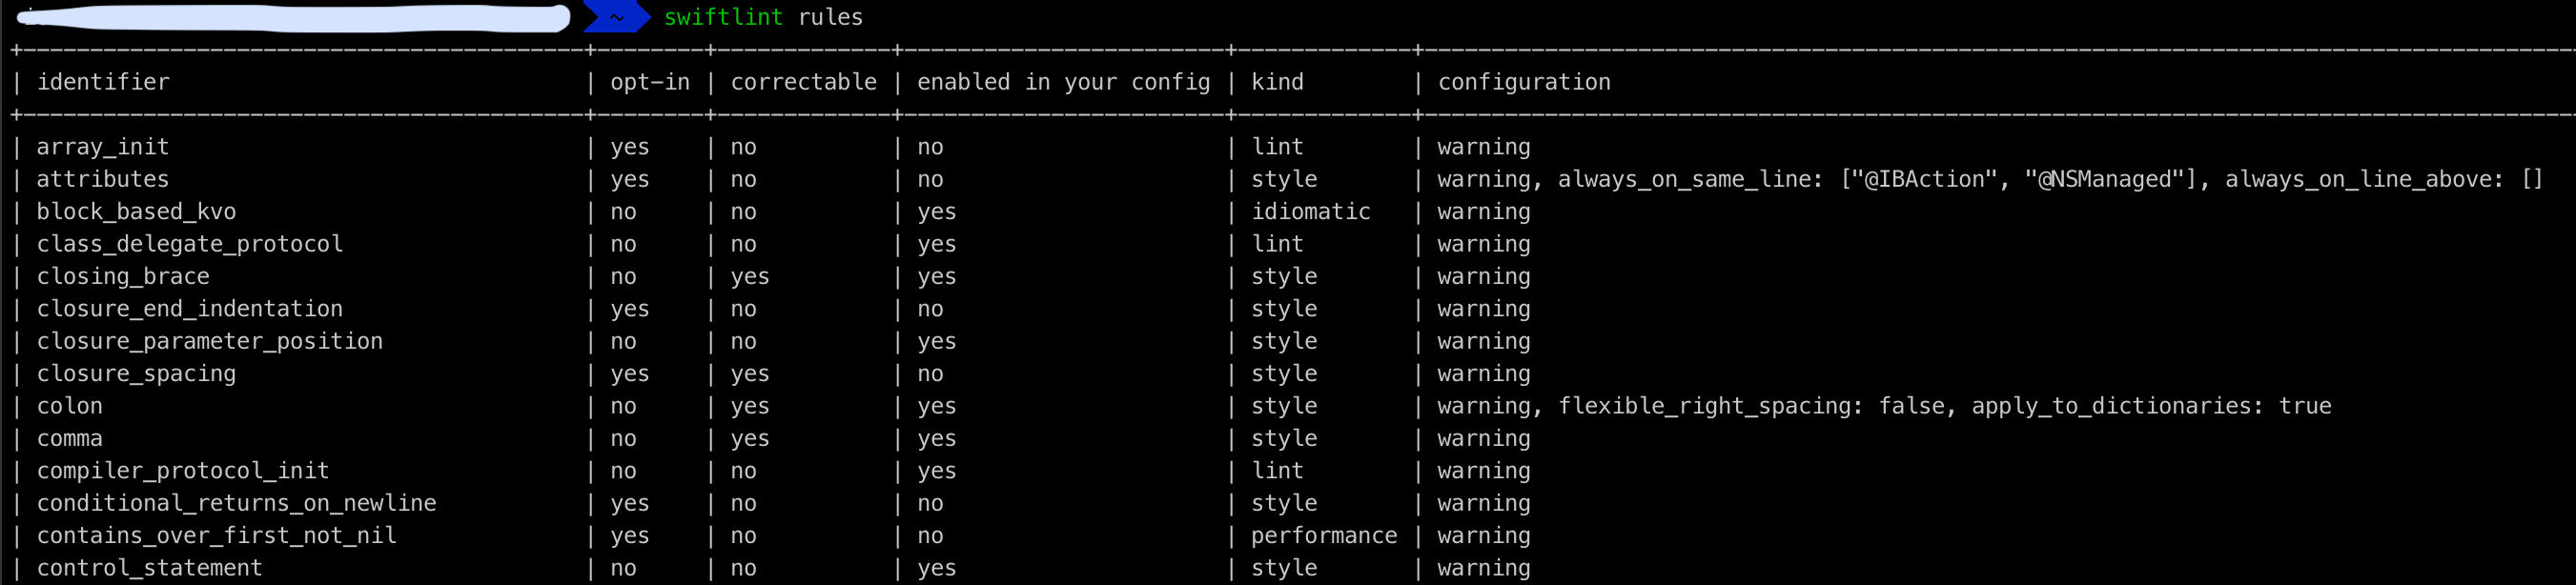
To get more details about each rule, you can run the swiftlint rules command appended with the identifier of the rule, like swiftlint rules todo. To add a rule to your .swiftlint.yml, all you have to do is to enable it in the opt_in_rules section.
An example of a swiftlint.yml file is the following:
force_cast: warning
force_try: warning

line_length:
  warning: 120
  error: 500

file_length:
  warning: 600
  error: 1000

function_body_length:
  warning: 40
  error: 120

opt_in_rules:
  - empty_count
  - force_unwrapping
  - legacy_constant
  - legacy_constructor
  - private_action
  - private_outlet
Apart from these rules, there is the option to add some customs rules by using some regex expression. This can be done by appending the swiftlint.yml file with a custom_rules section containing the rule.
For example, to add a rule to enforce an empty space after a guard statement add the following snippet to your swiftlint.yml file:
custom_rules:
  empty_line_after_guard:
    name: "Empty Line After Guard"
    regex: '(^ *guard[ a-zA-Z0-9=?.\(\),><!]*\{[ a-zA-Z0-9=?.\(\),><!]*\}\n *(?!(?:return|guard))\S+)'
    message: "There should be an empty line after a guard"
    severity: warning
Despite the fact that SwiftLine offers so many rules and such flexibility for customizations, sometimes you may not able to comply to a rule. SwiftLint has got you covered for this scenario too.
You can use a comment in the code file to disable the check for a specific rule to a specific line. To do so, just add a comment as in the following snippet.
// swiftlint:disable:next force_cast
let noWarning = NSNumber() as! Int
To run the command against a single file, you can use the option --path when running the swiftlint lint command like swiftlint lint --path Project/AppDelegate.swift. Alternatively, you can use the following command if you want to run against two or more files,
SCRIPT_INPUT_FILE_COUNT=2 SCRIPT_INPUT_FILE_0="Project/AppDelegate.swift" SCRIPT_INPUT_FILE_1="Project/ViewController.swift" swiftlint lint --use-script-input-files
Last but not least is the process of fixing the linting issues. For some rules this has to be done manually but for some others it can be done automatically. If you notice, when running the swiftlint rules command, each rule has a column named correctable. This means that those rules can be automatically fixed by simply running the swiftlint autocorrect command. And of course, the above-mentioned ways of running against one or more files can be applied for the autocorrect command too. Also, a different lane can be added to the Fastfile to cater for the autocorrect using the autocorrect mode.
For example,
  desc "Run lint autocorrect"
  lane :lint_autocorrect do
    swiftlint(
      mode: :autocorrect,
      executable: './Pods/SwiftLint/swiftlint',
      config_file: '.swiftlint.yml',
    )
  end
Conclusion
This is just an introduction to the full list of options that SwiftLint provides. Despite the fact that only a handful of options are mentioned, it is clear that SwiftLint is a great tool to use and can help to provide consistency in the codebase and reduce the code smells.
Thanks for reading! If you found this post useful, consider buying me a coffee to support the blog. For questions or comments, feel free to reach out on X!
This is my last blog post for 2018, so …
Merry Christmas and a Happy New Year!! ![]()
![]()
