For quite a long time I wanted to experiment with the creation of a custom Xcode template and finally the time has come!! In this article, I will try to describe step-by-step the process of creating a custom Xcode template from scratch. For those unfamiliar with the term, Xcode template is something we use quite often. When creating a new file or a new project, Xcode offers a wide variety of template options to choose from.
For example, when creating a Cocoa Touch Class, you select the superclass and the preferred language, be it Swift or Objective-C. Based on these choices, a file (or more) will be created. In case of a UIViewController subclass, the end result will be a file with a subclass of UIVIewController containing the viewDidLoad implementation in the selected language. Though, apart from those predefined templates, we are also able to create and add our own custom Xcode templates, or use some custom templates developed by the community.
What is the end result?
In my case, what I would like to achieve is to create a template for when I add a new feature/module to an existing project. Depending on the architecture of the project and the team, each feature usually follows some specific conventions regarding the folder structure and the required components. That means that every time a new feature is added, we have to do some manual steps to create the folder structure and the classes. For this article, I am going to use Coordinators and MVVM, so every new feature adheres to the following folder and naming conventions
<MODULE_NAME>
├── Coordinators
│   └── <MODULE_NAME>Coordinator.swift
├── ViewControllers
│   └── <MODULE_NAME>ViewController.swift
└── ViewModels
    └── <MODULE_NAME>ViewModel.swift
And this is what I would like to achieve. An Xcode custom template that will create the above-mentioned structure and add all the boilerplate code for the instantiation of each component.
How do I start?
A way to start is by taking a look at the existing file templates. You can find all the default Xcode templates inside the directory:
/Applications/Xcode.app/Contents/Developer/Platforms/iPhoneOS.platform/Developer/Library/Xcode/Templates/
Navigating through this directory, you can find a bunch of templates. For instance, the Cocoa Touch Class template is located under File Templates > Source > Cocoa Touch Class.xctemplate. There, you can find all the template files for all the possible options that you have when creating a Cocoa Touch Class from Xcode.
But, if you want to add your own custom template, this directory is not the proper one. Instead, use
~/Library/Developer/Xcode/Templates/
This folder contains two sub-folders: File Templates and Project Templates. The first one is for the templates that are meant to be used on an existing project, and is the location where we are going to place our template, whereas Project Templates is the location for templates used when creating an entirely new project.
So, now we are ready to start building our own template!!
Preparation
To start with, let’s create a folder inside this directory, that will eventually contain the template files. The folder should have an .xctemplate extension. For example, I use IDModule.xctemplate. For a template to be visible on Xcode it is required to have three files, the TemplateInfo.plist, TemplateIcon.png and TemplateIcon@2x.png.
The TemplateIcon.img is a 48x48 image whereas the TemplateIcon@2x.png is a 96x96 image and are the thumbnails that will be presented in the template selection window on Xcode.
The TemplateInfo.plist will contain the configuration of the template and for my case it will look like this (the actual file can be found on this gist).
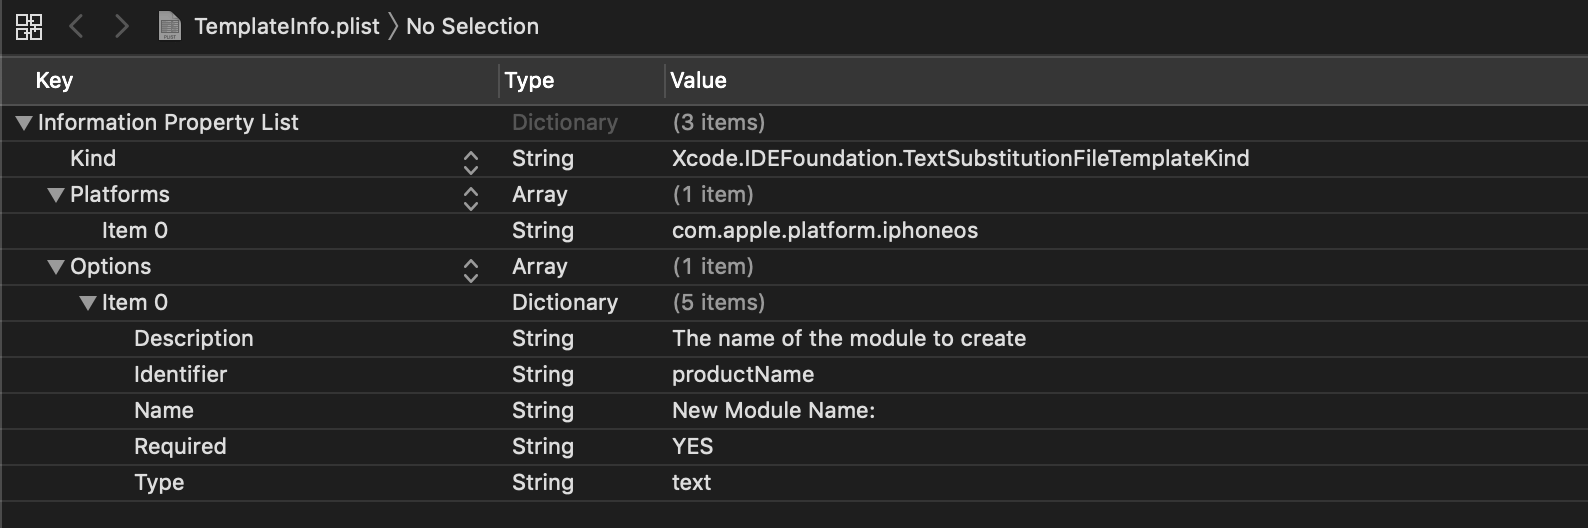
As you can see, it contains three keys: Kind, Platforms and Options. Let’s check each of those one by one.
The first one is the Kind. It describes the “kind” of the template and here we use the value:
Xcode.IDEFoundation.TextSubstitutionFileTemplateKind
The next one is the Platforms key that describes which platform to target and it’s value is an array. Since our template is only for iOS, we only add one item with value com.apple.platform.iphoneos.
Lastly is the Options key which can be used to allow users to customize the template. In our scenario, we would like to get the name of the module from a user input. The value of this key is an array and each of the items is a dictionary with keys like Description, Identifier, Name, Required and Type. We use productName as an identifier so that Xcode will know that this is the name of the module and using it will populate some Xcode so-called text macros (___FILEBASENAME___ and ___FILEBASENAMEASIDENTIFIER___) that will later be used to create the directory and the files.
To find more information about the Xcode text macros, refer to the documentation provided by Apple and more specifically to Text macros reference and Text macro format.
Without further ado, we can now try to create a new template on Xcode and the module will be there but no file will be created yet.
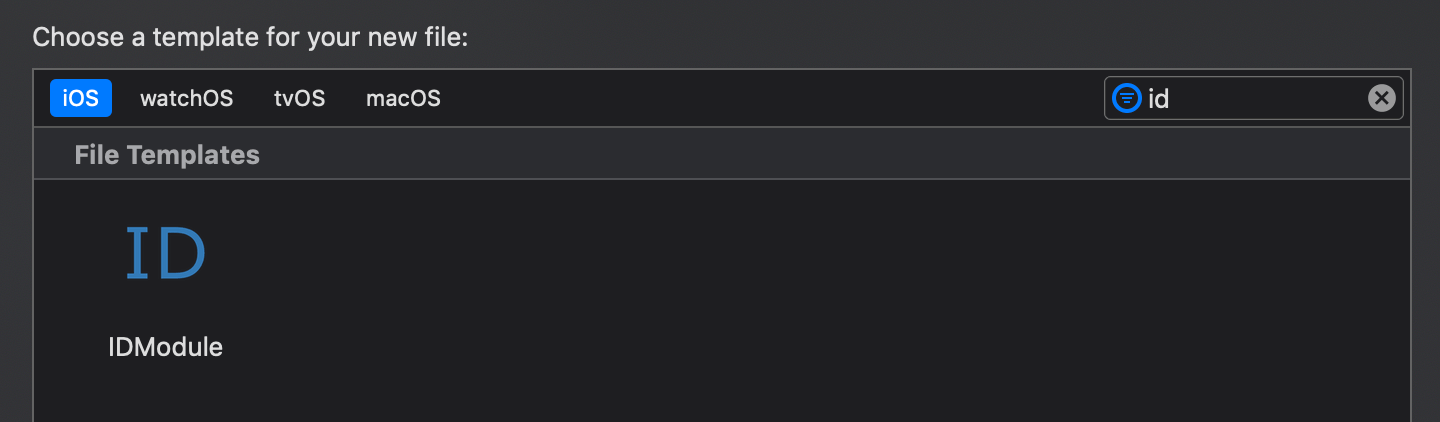
So let’s move on to creating the actual template!!
The template
As we mention before, there are some macros that can be used when creating a template. One of those is ___FILEBASENAME___, and it’s value is what we typed on the productName field when creating the module. To make our template create a folder with the name that we typed on the field, we will create a new folder inside the IDModule.xctemplate folder, and we will name it ___FILEBASENAME___ .
Next, we will create three more folders, named Coordinators, ViewControllers and ViewModels inside the ___FILEBASENAME___ folder. Finally, we will create three files named ___FILEBASENAME___Coordinator.swift, ___FILEBASENAME___ViewController.swift and ___FILEBASENAME___ViewModel.swift inside Coordinators, ViewControllers and ViewModels folders respectively.
The final structure of the IDModule.xctemplate folder will be something like this:
.
├── TemplateIcon.png
├── TemplateIcon@2x.png
├── TemplateInfo.plist
└── ___FILEBASENAME___
    ├── Coordinators
    │   └── ___FILEBASENAME___Coordinator.swift
    ├── ViewControllers
    │   └── ___FILEBASENAME___ViewController.swift
    └── ViewModels
        └── ___FILEBASENAME___ViewModel.swift
Until now, we have created the folder structure and the files. Let’s now move to the contents of each of those files.
For the files, we are going to use a few more text macros like ___FILEHEADER___, ___FILEBASENAMEASIDENTIFIER___ and ___VARIABLE_productName:identifier___ that will allow us to set the file header and the proper name for each class, struct and variable in the files.
___FILEBASENAME___Coordinator.swift
//___FILEHEADER___
import Foundation

class ___FILEBASENAMEASIDENTIFIER___ {

    func start() {

    }

    private lazy var viewModel: ___VARIABLE_productName:identifier___ViewModel = {
        let vm = ___VARIABLE_productName:identifier___ViewModel()
        return vm
    }()

    private lazy var viewController: ___VARIABLE_productName:identifier___ViewController = {
        let vc = ___VARIABLE_productName:identifier___ViewController(with: viewModel)
        return vc
    }()
}
___FILEBASENAME___ViewController.swift
//___FILEHEADER___
import UIKit

class ___FILEBASENAMEASIDENTIFIER___: UIViewController {

    init(with viewModel: ___VARIABLE_productName:identifier___ViewModel) {
        self.viewModel = viewModel
        super.init(nibName: nil, bundle: nil)
    }

    @available(*, unavailable)
    required init?(coder aDecoder: NSCoder) {
        fatalError("init(coder:) has not been implemented")
    }

    override func viewDidLoad() {
        super.viewDidLoad()

        // Do any additional setup after loading the view.
    }

    private let viewModel: ___VARIABLE_productName:identifier___ViewModel
}
___FILEBASENAME___ViewModel.swift
//___FILEHEADER___
import Foundation

struct ___FILEBASENAMEASIDENTIFIER___{

}
One interesting thing to notice is that ___FILEBASENAMEASIDENTIFIER___ is re-evaluated based on the context. For example, inside the ___FILEBASENAME___Coordinator.swift the value of ___FILEBASENAME___ and ___FILEBASENAMEASIDENTIFIER___ will be the actual name of the file including the Coordinator suffix.
All these files and the
TemplateInfo.plistare available on a gist.
So now it’s time to create a new module on Xcode!! Let’s say we want to add a new Login feature to a new app!! Using the IDModule template, the output that we will get will be like this: 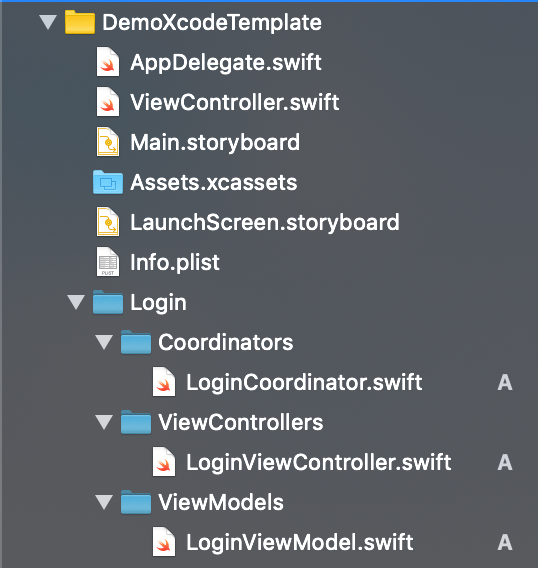
But!!
Some of you may have already noticed that something is wrong with the folder created. The color signals that it’s not a group and if you try to instantiate the Coordinator from somewhere in the rest of the app, you will be unable to do so.
This is happening because the template creates just a folder and not actually an Xcode group, so all the files inside the module are not members of the app target. Sadly, after some research, it seems that it is not currently possible to create a new group when you use a new file template, only when creating a template for a new project. A quick solution is to create the group from the folder and then delete the reference to the initial folder.
Point to the parent folder, right click and choose “Add files to “…””.
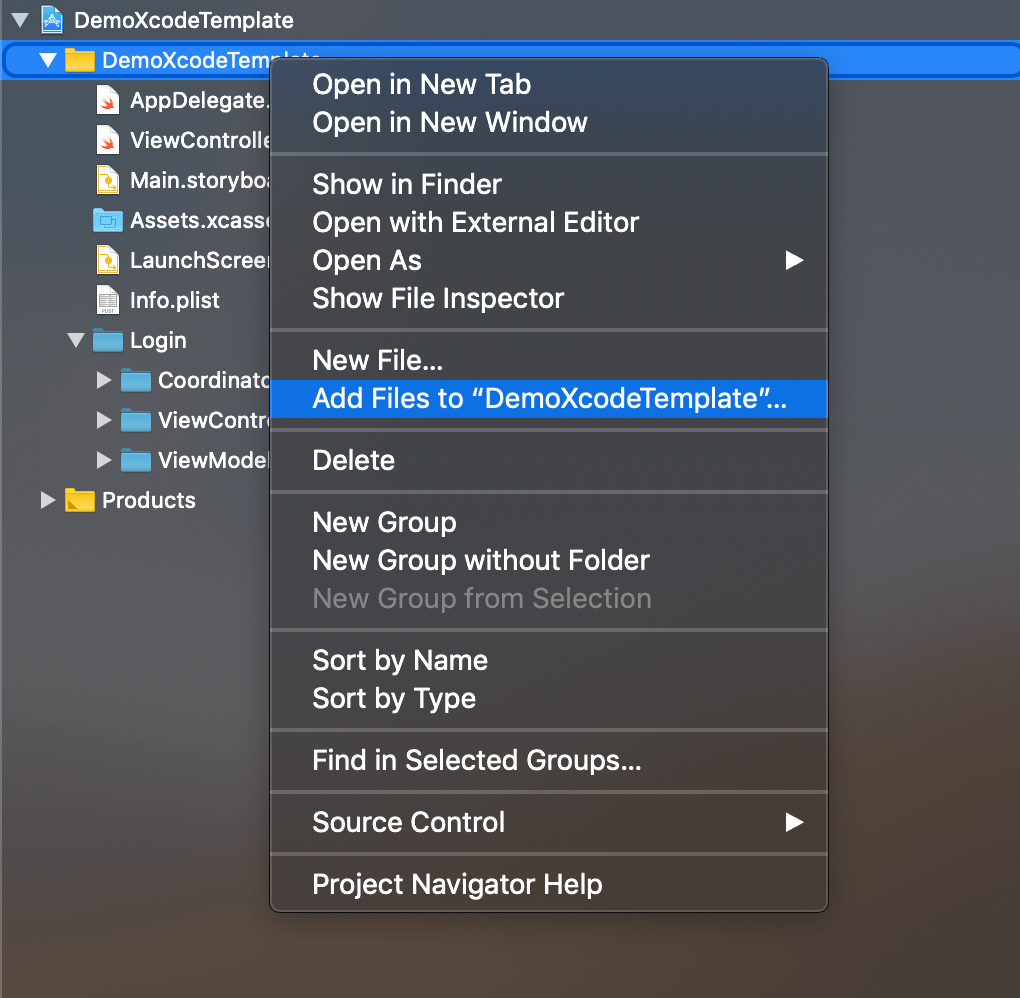
A new window will pop up. There, choose the root folder of your module, and pick “Create groups” for the field “Added folders”. Then press “Add”.
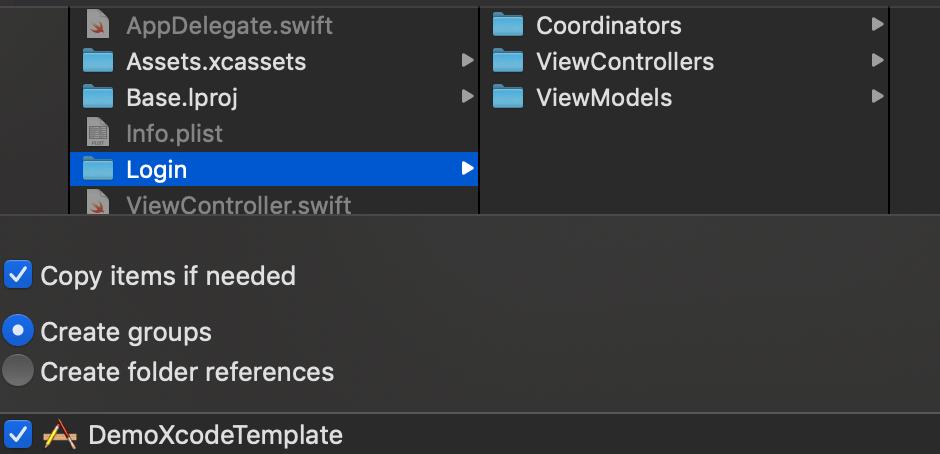
The new group is created, and now we can safely right click on the old folder of our module, choose “Delete” and pick the option “Remove reference”.
The new module is ready to be used!
Conclusion
To sum up, this article can be used as a guide to create a custom template and presents how easy and straight-forward is to do so. Of course it doesn’t cover all the available options such as adding more fields/options when creating a template and not only the name and based on them to create different file (like the case with Swift or Objective-C option) and maybe creating a base template that can be used by many child templates (the case for most of the Xcode predefined templates). In general, Xcode custom templates can be used to ease, in some extend, the process of creating a new file or a new module, eventually resulting in a more efficient way for working since it will remove some time-consuming and not so interesting tasks. And maybe guarantee some consistency amongst team members in the way modules and files are created.
Thanks for reading! If you found this post useful, consider buying me a coffee to support the blog. For questions or comments, feel free to reach out on X!
Until next time!
