As you may have noticed from the URL, I am using GitHub Pages to host this blog, which means that the whole code is open-sourced. Amongst other things, and one thing that I totally missed until recently, is that an open source repository should have a LICENSE.
I wanted to fix this but the problem was that I had no clue what each license means and how to choose one for my repository. As a result, I started to search and read more about Open Source licenses and in this post, I will try to document my learnings, in an attempt to help others who have the same problem and also have a post that could act as a future reference for myself.
Disclaimer: I am not a lawyer, so handle the following with care. If I have any error, misunderstanding or you have any suggestion, you can either contact me on X, fill an issue on GitHub or fork the project and submit a pull request against the source branch.
Introduction
Before we dive deeper into open source licenses, let’s introduce some background and terminology starting from the Open Source Initiative.
Open Source Initiative (OSI) is a non-profit organization that promotes the use of open source and maintains the Open Source Definition, which is a set of 10 criterias that any open source project should comply to.
Open Source Initiative uses the following definition for open source licenses:
Open source licenses are licenses that comply with the Open Source Definition — in brief, they allow software to be freely used, modified, and shared.
As we mention earlier, the Open Source Definition defines a list of requirements that open source projects should adhere to, and some of those are related with the license, like the following:
- Distribution of license
- License must not be specific to a product
- License must not restrict other software
- License must be technology-neutral
From my understanding and in an attempt to rephrase it, open source licenses are setting the rules required for open source to work. If a repository doesn’t explicitly specify the license, it means that you don’t have any legal right to use it, modify or share the code without the consent of the author of the repository. And that’s why having a license is important.
Copyleft and Permissive
Before we start describing the details for each license, it is worth mentioning that licenses can be classified in two big categories: copyleft and non-copyleft or permissive.
Licenses under the first category allow derivative works but require them to use the same license as the original work. So, for example, if you write some software and it is released under a copyleft license, and someone else wants to modify your software and distribute the modified version, then this modified version must have the same license as your software. For more info about copyleft, you can refer to OSI’s FAQ.
Contrary, a permissive open source license allows the derivative work to use and be distributed under another license, open or proprietary.
Depending on the preferences and the goals of the owner of the project, each category has its own advantages and drawbacks. Due to that, there are examples of both categories amongst the most widely used licenses. Let’s try to take a look on a few of them.
Licenses
GNU General Public License
The GNU General Public License(GNU GPL) is a series of copyleft licenses and probably it is the most popular example of this kind. It’s quite restrictive in the sense that it doesn’t allow to build commercial software on top of open source software.
It comes in three versions and the most widely used are the GPLv3 and the GPLv2, with the main difference being the addition of a clause on patent grants on GPLv3. Some popular projects using a GNU General Public License are Bash(GPLv3) and Linux(GPLv2).
TIL, Apple’s decision to drop
Bashin favor ofzsh, amongst others, maybe has something to do with Bash being licensed under GPLv3. Interestingly, though Bash has evolved a lot over the last years, Apple was stuck in version3.2.*, released in 2007, because after that version Bash changed the license fromGPLv2toGPLv3.
Apache License 2.0
Apache License is a permissive license written by the Apache Software Foundation(ASF).
It allows you to distribute the modified parts under any license, but you are required to release all the unmodified part under the license of the initial project (in that case the Apache License). Also, if the initial project contains a “NOTICE” file, any derivative project must include a copy of this file. Lastly, similarly to GPLv3, it has a specific clause to address patent rights.
Some popular projects using Apache License 2.0 are Swift, Android and most of the Apache Software Foundation(ASF) software.
Berkeley Software Distribution (BSD) licenses
BSD licenses are also a series of permissive licenses like the Apache License 2.0. There are 4 versions and the original one was released containing 4-clauses. Then it came the 3-clause license or the Modified BSD License, with the difference being the removal of the advertising clause which required that:
All advertising materials mentioning features or use of this software must display the following acknowledgement:
This product includes software developed by the <organization>.
Another version is the 2-clause license or the FreeBSD License, due to its usage in the FreeBSB operating system. The difference between the 3-clause and this license is the removal of the non-endorsement clause which states that:
Neither the name of the <organization> nor the names of its contributors may be used to endorse or promote products derived from this software without specific prior written permission.
Finally, there is the 0-clause license or the Zero Clause BSD, which goes a step further and omits the clauses about the requirement to include the copyright notice, license text, or disclaimer in either source or binary forms.
A popular project that is using a BSD license and more specifically the 3-clause version is Go.
Another popular project that was using a BSD license was React, until it was relicensed under the MIT license in 2017. React was initially licensed under the 3-clause BSD plus a patent clause and if you are interested, here is the commit with the change of the license.
MIT License
As mentioned earlier, React is currently licensed under the MIT license. This license is a short, permissive license and basically it allows the reuse as a proprietary software, with the only requirement to keep a copy of the license and the copyright notice. Alternatively, the software can be relicensed under a different license to avoid having to comply to this requirement.
MIT license is one of the most used license (if not the most) in the open source world, and a lot of popular projects are using it. For example, React, Ruby on Rails, jQuery, Angular.js and Bootstrap are some of the projects licensed under the MIT license
Due to its simplicity, openness and popularity, the MIT license is the one that I have decided to go for the repository of this blog.
Now, let’s see how we can add a license in case we don’t have in a GitHub repository.
How to add a license on a GitHub repository
Nowadays, adding a license on a GitHub repository is an easy process.
First of all, navigate to the main screen of your project and click on the “Create new file” button as shown in the following screenshot.

You will get redirected to a new screen. There, you will be prompted to enter a file name, where you should type the name LICENSE.

As you can see from the above screenshot, on the right side of the screen, a button with a label “Choose a license template” will appear. Click on this button and you are going to be redirected to a new screen which will have a list of license to choose from.
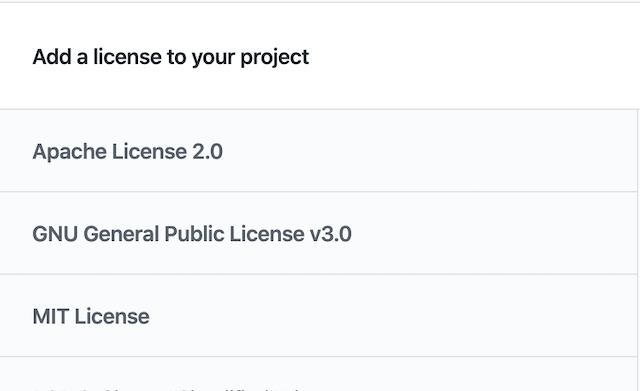
Select a license from this list and then check the form that appears on the right side of the screen to fill all the information needed, like the full name of the owner and the year.
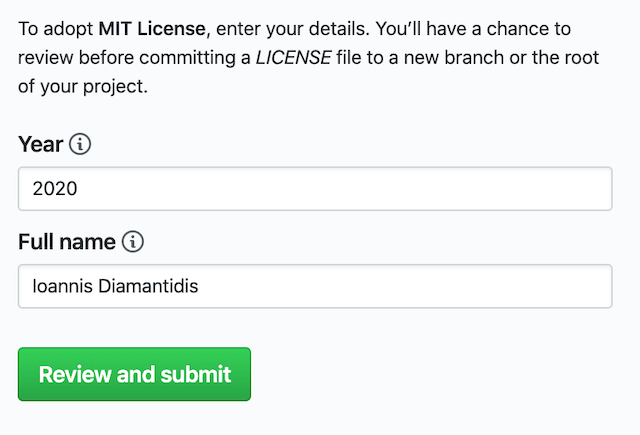
After that, you can press the “Review and submit” button.
Then add a commit message and choose from the options if you want to commit directly to the default branch or create a new branch and start a pull request.
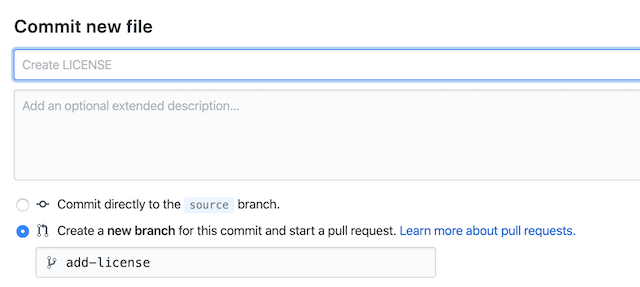
Lastly, when you are ready, press the “Commit new file” button and you are good to go.
Conclusion
And that’s about it! In this post, we have examined some terminology related to open-source licenses such as the Open Source Initiative, the Open Source Definition and what is the differences between a copyleft and a permissive license. Then, we learn some basic information about the most used copyleft and permissive licenses. Finally, we have enumerated the steps needed to add a LICENSE on a GitHub repository.
Definitely, after writing this post, I now acknowledge why it is important to have one license in every repository and what are the differences between the licenses, which is quite useful when the time comes to choose one for your repository.
Thanks for reading! If you found this post useful, consider buying me a coffee to support the blog. For questions or comments, feel free to reach out on X!
Until next time!
