Today, I had yet another usual Sunday morning. Drinking my tea, doing some UI experiments on this blog and using Chrome’s DevTools and the Device Mode to make sure that those changes won’t break the website in different screen dimensions. ![]()
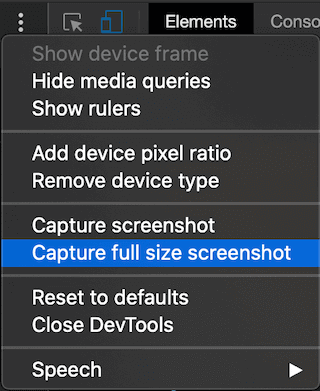
Until the moment I found that Chrome DevTools has an option to capture full size screenshots!!
My first thought was that this is great, I could use it to track the evolution of the UI on my blog over time. A second later though, a light bulb went on in my head. ![]()
What if I could write a script that would do the same? This would not only help me keep a record of the UI changes over time but potentially could ease the tedious and inefficient process of changing devices and making sure that everything looks good. ![]()
![]()
The idea is to create a script that would open a webpage and then simulate me changing the screen devices and dimensions on Chrome DevTools. After that, this script would take screenshots for all these dimensions and store them on the local filesystem (or remote). Finally, I would just have to browse though the images and review them to make sure that everything looks as expected.
And that’s basically the topic of this post. Now that I have the idea, it’s time to start implementing it, right? But in which programming language?
The language decision
I decided to go with Scala.
A few years ago, I was working on a project using Scala and I had a really good experience, though certain circumstances didn’t make it possible to dig deeper and get more accustomed to language features like functional programming and its ecosystem.
Scala integrates seamlessly features of object-oriented and functional languages, is a type-safe language that uses type inference, and provides syntactic sugar for a lot of use cases such as pattern matching, for-comprehension and case classes.
All of these result in a language with concise syntax and expressiveness. On top of that, it runs on a JVM and because it supports compatibility and interoperability with Java, it allows to use most of the Java libraries.
And though it’s been a while since the last time I worked with Scala, I think that writing this script in Scala, would be a great opportunity to refresh my Scala knowledge and slowly learn to write more intuitive Scala programs.
Implementation
Let’s start with the implementation
First thing first, to run this script, you are going to need Scala and sbt. You can refer to Scala documentation to find more information on how to set up both of them.
This script is built and run with the following versions:
java -version: 1.8.0_172sbt sbtVersion: 1.3.9
To create a new sbt project, just run sbt new scala/hello-world.g8. At some point, you will be asked to enter the name of the application. In my case, I have used scala-screenshots.
After this script is completed, the created project will have the following folder structure:
scala-screenshots
├── build.sbt
├── project
│   ├── build.properties
│   └── target
├── src
│   └── main
│       └── scala
│           └── Main.scala
└── target
Starting from the top, build.sbt is the file where we set the information about the project, like name, version and dependencies.
So, let’s open this file and add the dependencies we will need. We are going to use Selenium to open the webpage and capture the screenshot and Commons IO to save the screenshot to a file. Based on that, build.sbt should look similar to the following snippet:
scalaVersion := "2.13.1"

name := "scala-screenshots"
organization := "io.github.diamantidis"
version := "1.0"

libraryDependencies += "org.seleniumhq.selenium" % "selenium-java" % "3.14.0"
libraryDependencies += "commons-io" % "commons-io" % "2.6"
Next, we are going to need a WebDriver for Selenium. You can refer to Selenium website’s page about supported Browser Drivers to find which of the supported one you would like to use.
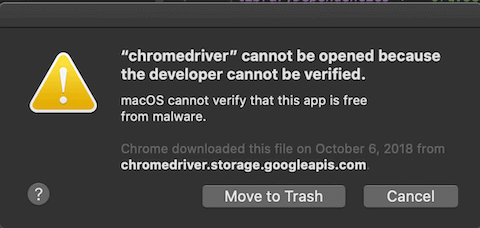
In my example I am going to use ChromeDriver, so make sure that you download it and place it in the root directory of our project.
You may get some security warning on the first run of the script, so make sure to allow the use of
chromedriver.
Now we can open our Main.scala file and start building our program.
By default the content of the file is the following:
object Main extends App {
  println("Hello, World!")
}
You could either use your favourite IDE to run this or you could open the command line, navigate to the root directory of the project and execute sbt run.
In both cases you should the “Hello, World!” message.
Let’s remove the body part of this object and instead add some variables for the dimensions and the url that we are interested in:
  case class ScreenDimension(width: Int, height: Int)

  // Define dimensions and urls
  val dimensions = List(
    ScreenDimension(1920, 1080), // Laptop
    ScreenDimension(414, 896) // iPhone XR
  )

  val Host = "https://diamantidis.github.io"
  val url = s"${Host}/2020/04/19/scala-script-for-fullsize-screenshots-for-different-screen-dimensions"

  // rest of the code goes here
Next, we are going to setup the WebDriver using the following lines:
  val options = new ChromeOptions()
  options.addArguments("headless")
  val webDriver = new ChromeDriver(options)

  // rest of the code goes here
We could use some other WebDriver, by replacing those lines. For example, for Safari we could use:
val webDriver = new SafariDriver()
After that, I will compute the directory where the screenshots will be saved.
  val calendar = Calendar.getInstance()
  val baseDir = "./screenshots"
  val day = "%02d".format(calendar.get(Calendar.DATE))
  val month = "%02d".format(calendar.get(Calendar.MONTH) + 1)
  val year = calendar.get(Calendar.YEAR)

  val directory = s"$baseDir/$year-$month-$day"

  // rest of the code goes here
Here, I am use the current date so that screenshots don’t override screenshots from previous changes.
After that, I will compute the name of the file where we will save the screenshot:
  val filename = url.replace(Host, "")
    .toLowerCase()
    .replaceAll("^/+", "") // trim leading '/'
    .replaceAll("/+$", "") // trim trailing '/'
    .replaceAll("/", "-") // replace '/' with '-'
    .replaceAll("^$", "homepage") // if it's empty string, then it's the home page

  //  rest of the code goes here
Now, we can open the webpage and set the screen dimension like in the following screen:
  webDriver.get(url)
  Thread.sleep(500)

  dimensions.foreach { dimension =>
    val width = dimension.width
    val originalHeight = dimension.height

    val originalDimension = new Dimension(width, originalHeight)
    webDriver.manage.window.setSize(originalDimension)

    // rest of the code goes here
  }

  webDriver.quit()
In this snippet, we open the page once, wait half a second to load, and then iterate over the dimensions and update the window size with each dimension. Also note that it’s important to call quit() to close all windows, and exit the driver.
Though the above-mentioned snippet will set the dimensions for the window, we won’t be able to get the full size screenshot for the pages that have a height greater than the height we set when defining the dimensions. To fix this problem we are going to get the height of the body of the webpage and update the height of the window to match this value.
    val body = webDriver.findElementByTagName("body")
    val height = body.getSize.height

    val newDimension = new Dimension(width, height)
    webDriver.manage.window.setSize(newDimension)
    // rest of the code goes here
Having done that, we are ready to get the full size screenshot with the following line:
val file = webDriver.getScreenshotAs(OutputType.FILE)
Lastly, we will save the screenshot to the local file system:
    val destination = s"$directory/$filename(${width}x$originalHeight).png"
    val destFile = new File(destination)
    FileUtils.copyFile(file, destFile)
And this is it!
You can find all these snippets on a GitHub project that I have created.
Result
If you run the script (sbt run), you will see all the screenshots inside the screenshot folder on the root folder of your directory.
screenshots
└── 2020-04-19
    ├── 2020-04-19-scala-script-for-fullsize-screenshots-for-different-screen-dimensions(1920x1080).png
    └── 2020-04-19-scala-script-for-fullsize-screenshots-for-different-screen-dimensions(414x896).png
Thinking about the future, a potential next step is to add support for different WebDrivers so that I could see how the website is rendered on different browsers. And maybe make it a more user-friendly CLI app that would accept arguments and options and provide some feedback to the user.
Lastly, it would be a great opportunity to try and use some libraries like ZIO to make it run concurrently and also make the code more testable.
Conclusion
To sum up, in this post, I have created a Scala project that uses Selenium to capture full size screenshots of a webpage for different screen sizes and save them on a local directory.
This could be of use if you make some UI changes on a webpage and you want to verify that everything looks great on different screen sizes, or if you want to keep a record of how the UI of a website evolves over time.
Thanks for reading! If you found this post useful, consider buying me a coffee to support the blog. For questions or comments, feel free to reach out on X!
Until next time!
