Displaying web content in an app is quite easy and straightforward with WebViews but what happens when we want to open a communication channel between the app and the web page we load on a WebView?
Let’s say, for example, you want to “listen” to a button click event happening on the web page and take some action in the app. Or you want to update a label of a web page with some data from the app.
In this post, I will show you how you can communicate between the app and the web page of a WebView.
In order to do so, I am going to use an example to demonstrate how to achieve this communication in both directions; both from the web page to the app and from the app to the web page.
Let’s get started!
This post is based on
Flutter 2.5.2andDart SDK 2.14.3
Implementation
The package
Flutter doesn’t have built in support for WebViews. As a result, we are going to use a package with name webview_flutter.
So first thing first is to edit pubspec.yaml and add the dependency:
dependencies:
  flutter:
    sdk: flutter
  webview_flutter: ^2.1.1
The HTML file
Next, we are going to create the web page that we will later load in the WebView.
For the sake of this article and for ease, we are going to create an index.html file which we are going to load in the webview instead of loading a webpage from a URL.
Let’s create an HTML file named index.html inside the assets folder (if the folder doesn’t exist, feel free to create one).
Then, we will open this file and add the following content:
<!DOCTYPE html>
<html>
    <head>
        <meta name="viewport" content="width=device-width, initial-scale=1"/>
        <style>
            .switch { position: relative; display: inline-block; width: 60px; height: 34px; }
            .switch input { opacity: 0; width: 0; height: 0; }
            label.switch { outline: none; }
            .slider { position: absolute; cursor: pointer; top: 0; left: 0; right: 0; bottom: 0; background-color: #ccc; -webkit-transition: .4s; transition: .4s; outline: none; }
            .slider:before { position: absolute; content: ""; height: 26px; width: 26px; left: 4px; bottom: 4px; background-color: white; -webkit-transition: .4s; transition: .4s; }
            input:checked + .slider { background-color: #2196F3; }
            input:focus + .slider { box-shadow: 0 0 1px #2196F3; }
            input:checked + .slider:before { -webkit-transform: translateX(26px); -ms-transform: translateX(26px); transform: translateX(26px); }
            .slider.round { border-radius: 34px; }
            .slider.round:before { border-radius: 50%; }
        </style>
    </head>
    <body>
        <h2 id="value">Toggle Switch is off</h2>
        <label class="switch">
            <input type="checkbox" name="myCheckbox">
            <span class="slider round"></span>
        </label>
    </body>
</html>
For brevity reasons, the CSS part is minimized.
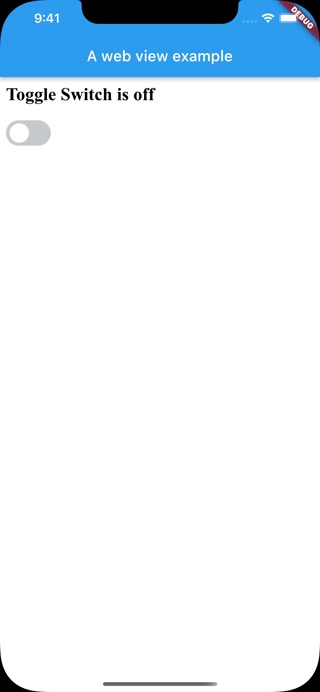
This HTML file produces a web page with a label and a toggle switch. Our goal for this article is to listen to the toggle events from the app and update the text on the label to represent the corresponding state of the toggle switch.
To be able to access this html file from our application, we have to edit pubspec.yaml and add the following under the flutter section:
flutter:

  assets:
    - assets/index.html
The app
Now, with all the preparations done, we can focus on the app!
First of all, we will import the package:
import 'package:webview_flutter/webview_flutter.dart';
Then, we can create our webview like this:
WebViewController? _webViewController;

Widget buildWebView() {
    return WebView(
        initialUrl: 'about:blank',
        javascriptMode: JavascriptMode.unrestricted,
        onWebViewCreated: (WebViewController webViewController) async {
            _webViewController = webViewController;
            String fileContent = await rootBundle.loadString('assets/index.html');
            _webViewController?.loadUrl(Uri.dataFromString(fileContent, mimeType: 'text/html', encoding: Encoding.getByName('utf-8')).toString());
        },
    );
}
In this snippet, we added a function that will return a new WebView and we pass some parameters.
Firstly, we will use about:black as the initial URL to load an empty page. Then, we will set javascriptMode to unrestricted to allow the execution of Javascript code, and lastly, when the web view is created, we will load the content of the index.html and load it to the web view.
The only thing left is to call this function from the Widget build(BuildContext context), add the required imports and run the app. If you do so, you will be able to see the page with the label and the toggle!
Adding a message handler
The next step is to enable our WebView to receive messages from the web page. For this, we will update the WebView we created before and add the javascriptChannels: parameter, like in the following snippet:
Widget buildWebView() {
    return WebView(
        .
        .
        .
        javascriptChannels: <JavascriptChannel>{
            JavascriptChannel(
                name: 'messageHandler',
                onMessageReceived: (JavascriptMessage message) {
                    print("message from the web view=\"${message.message}\"");
                },
            )
        },
    );
}
Here, we create a new JavascriptChannel with name messageHandler and provide a callback for when a message is received. For now, we just print the message.
We are now ready to send our messages from the web page.
Let’s see how!
Sending message from the webpage
For this part, we are going to use some JavaScript to listen to the toggle events and then send a message to the app. This message will be different if the toggle is selected or not. Let’s edit our HTML file and before the closing </body> tag, add the following content:
<script type="text/javascript">
    var _selector = document.querySelector('input[name=myCheckbox]');
    _selector.addEventListener('change', function(event) {
        var message = (_selector.checked) ? "Toggle Switch is on" : "Toggle Switch is off";

        if (messageHandler) {
            messageHandler.postMessage(message);
        }
        });
</script>
In this script, we are adding an eventListener for the toggle change event, and depending on whether it is selected or not, we are using the messageHandler that we created previously, to call the function postMessage, which in turn will trigger the onMessageReceived of the JavascriptChannel with the name messageHandler.
If you run the app and turn the toggle on and off, you will be able to see some messages on the console like message from the web view="Toggle Switch is on".
The last thing to achieve our goal is to update the label of the web page when we change the value of the toggle.
Evaluating JavaScript to update webpage’s UI
WebViewController has a function with name evaluateJavascript and this is what we are going to use to update the UI.
Head over to the definition of the JavascriptChannel and instead of the print command on the onMessageReceived callback, add the following snippet:
final script = "document.getElementById('value').innerText=\"${message.message}\"";
_webViewController?.evaluateJavascript(script);
In this snippet, we are creating a variable with the JavaScript code to change the label on the web page, and then use the evaluateJavaScript to execute this code.
And that’s about it, if you now run the app, the text of the label will change when the toggle is switched on or off.
Conclusion
In this post, we have seen how to achieve bidirectional communication between a WebView and a web page. Using this, we can use events from the website to trigger actions on the app and similarly adjust the content of the loaded website based on the information we have on the app.
Thanks for reading! If you found this post useful, consider buying me a coffee to support the blog. For questions or comments, feel free to reach out on X!
Until next time!
