How many times have you started a project with the intent to follow practices such as writing unit tests and enforcing a code style, only to give up after a while?
Despite all the initial good will and motivation, having another task to remember and perform every time we make a code change, makes it harder and harder to stay consistent and follow these practises for a long time. The cause can vary from case to case; be it that we just forget it, laziness or reasons that led us to put these efforts aside in an attempt to increase speed and velocity.
As with every attempt to form a habit, it is important to make is as easy as possible to commit to this habit. This applies to our scenario too; it will increase the possibility of actually following these practices if it was super easy and not our responsibility to remember to run them every single time.
And that’s exactly what Continuous Integration is all about; to develop pipelines of tasks that will be executed on predefined triggers (e.g. when checking in new code) and when something is failing to notify us, so that we can take the proper actions.
Solution
Long story short, in this post I will try to document the steps that I took to setup a continuous integration solution to run unit tests and coding style tools for an iOS and an Android app built with Kotlin Multiplatform Project.
For the purposes of this post I will make use of the project created on the previous posts related to Kotlin Multiplatform Project, about setting up a project, applying some changes in the default structure, setting up unit tests and setting up code styling tools. This project is also available on GitHub and Gitlab.
Ideally what I would like to achieve is that each time we push some code on the androidApp directory to run only the Android app related tasks, every time we push something on the iosApp directory to run the iOS related tasks and when something is changed on the shared directory to run all the tasks (tests and code styling on the shared library, Android and iOS)
There are plenty of CI solutions available such as Travis CI, CircleCI and GitLab CI, but after a quick investigation I think that GitLab CI is the best available option for this kind of implementation. More specifically, the only:changes feature makes it quite easy to implement the aforementioned logic of running specific tasks based on the directory of the change.
Setup
To start with, GitLab CI requires repos to have a file named .gitlab-ci.yml on the root directory. This file will contain all the configuration about the jobs that you want GitLab CI to execute. When this file is added, GitLab will detect it and use a tool named GitLab Runner to execute these jobs.
Thus, in order to use GitLab CI, we have to create a GitLab runner for our jobs and then define those jobs in the .gitlab-ci.yml.
To check about the Runners, you can go to GitLab, open the project, and choose Settings > CI/CD. Then, expand the Runners section.
There are a few Shared Runners but sadly they are not suitable for our project since none of them comes with Xcode. Other solutions for Runners, like Docker are also rejected for the same reason. So, this leads me to Set up a specific Runner manually on my local machine.
The process of running a GitLab Runner on MacOS is quite straight-forward and you can follow the steps described on the documentation.
Briefly,
- download the binary by executing the following command:
sudo curl --output /usr/local/bin/gitlab-runner \ https://gitlab-runner-downloads.s3.amazonaws.com/latest/binaries/gitlab-runner-darwin-amd64 - change the permissions to execute it
sudo chmod +x /usr/local/bin/gitlab-runner - register the runner (where $URL and $TOKEN are those in the
Set up a specific Runner manuallysection on GitLab’s CI/CD page:gitlab-runner register -n \ --name "kmp-runner" \ --url $URL \ --registration-token $TOKEN \ --executor "shell" \ --tag-list "ios,android, kmp" - install the runner
gitlab-runner install - and finally, start the runner:
gitlab-runner start
If you refresh the CI/CD page on Gitlab, you will be able to see the new runner under the section Runners activated for this project.
Implementation
After this, let’s create create a file named .gitlab-ci.yml on the root directory of our project and define the jobs that we want to run.
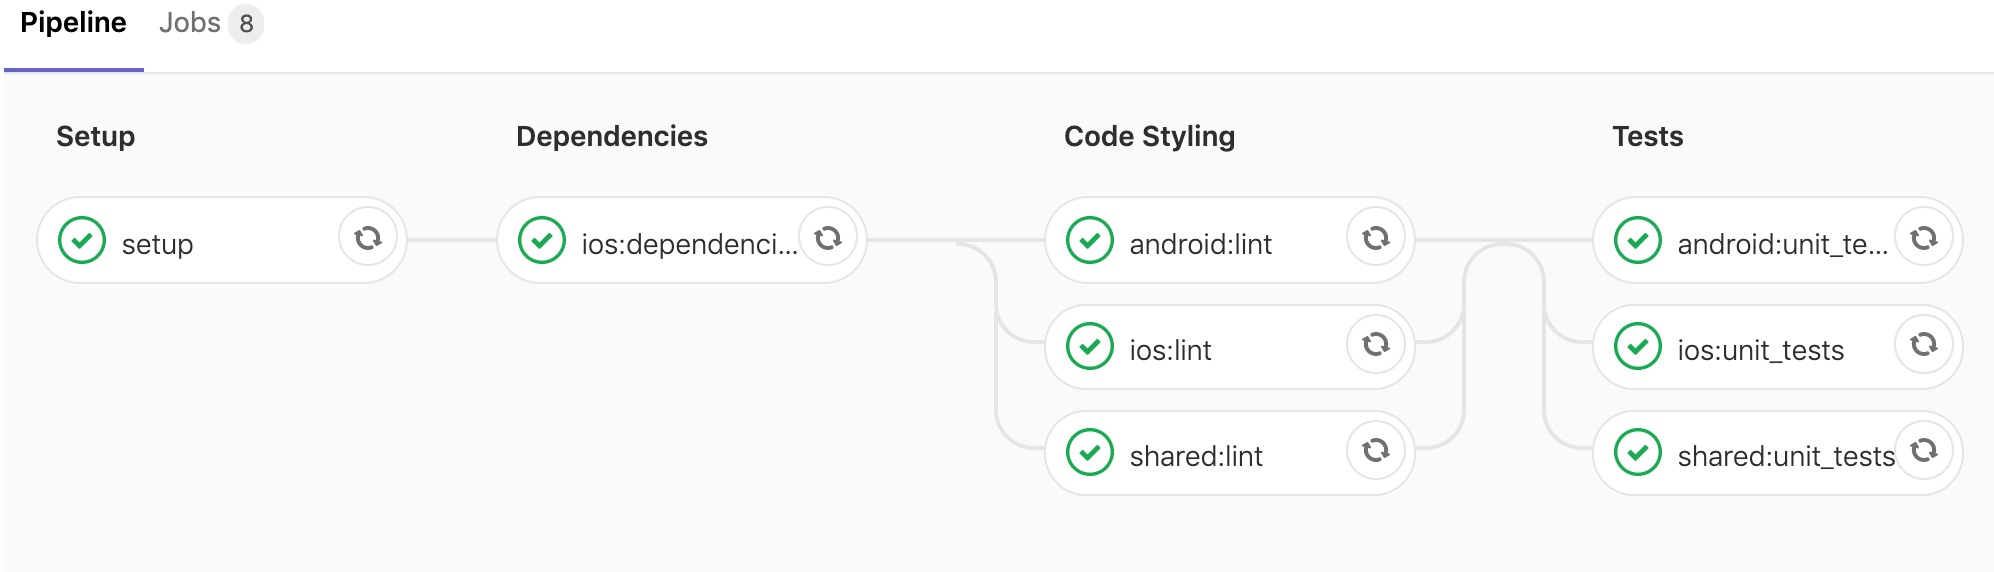
First, we have to install bundler and then use bundle install to install fastlane and cocoapods. Furthermore, we have to setup a few environmental variables for fastlane. This step is supposed to run regardless of the directory of the change.
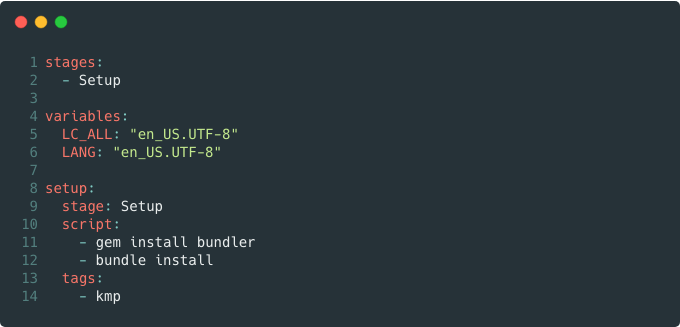
Here you can find the commit on GitLab
Then, it’s time to install the required dependencies. Currently we only have to run pod install on the iOS flow, so we want this step to be executed after the initial setup is finished and only if there is some change either on the iOS app or the shared library. Since the pods are going to be used on the next steps of the pipeline, we have to make sure that the directory iosApp/Pods will be cached.
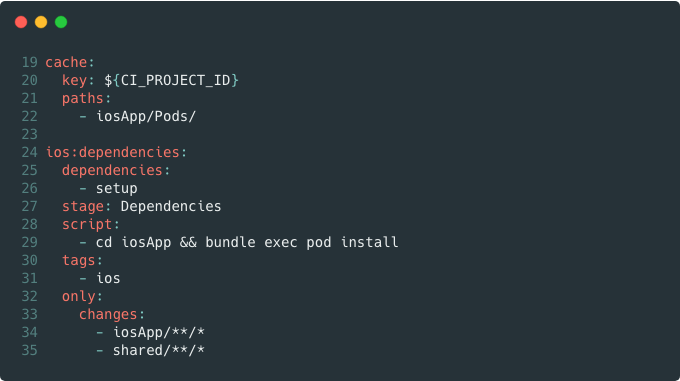
Here you can find the commit on GitLab
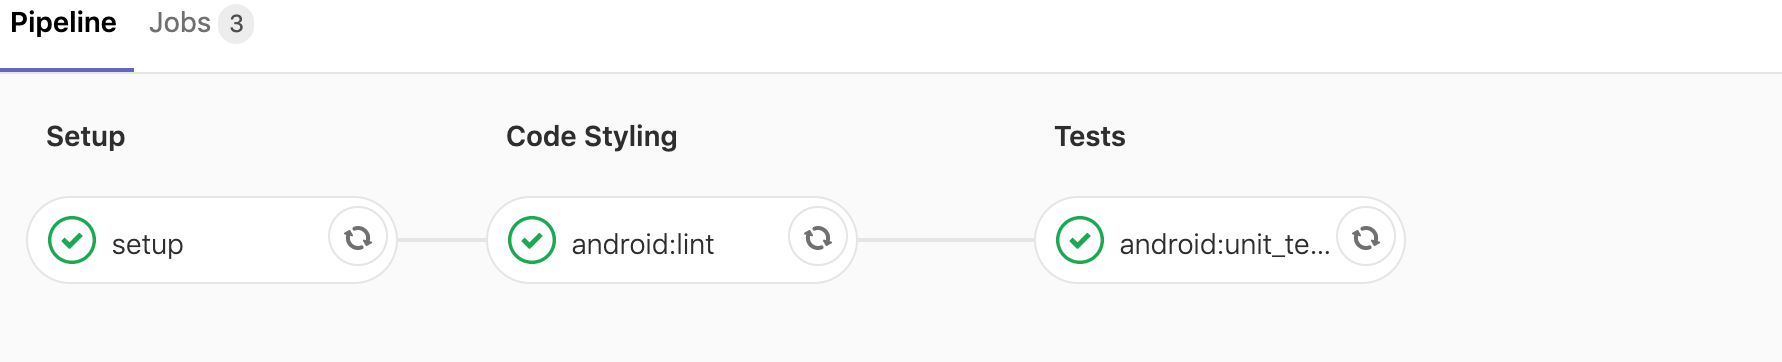
After that, we can proceed to the tasks related with code quality. For each flow, be it the iOS app, the Android app or the shared library, we have setup, on a previous post, some commands to lint and verify that our code conforms to some code style rules. Thus, we will add a new stage named Quality and three new jobs, one for iOS, one for Android and one for the shared.
The iOS one should start if the ios:dependency job is finished and it should be executed only if there is some change on the iosApp or shared directory. Similarly, the Android lint job should run only if there is a change on the androidApp or the shared directory and the shared:lint job only when there is a change on the shared directory.
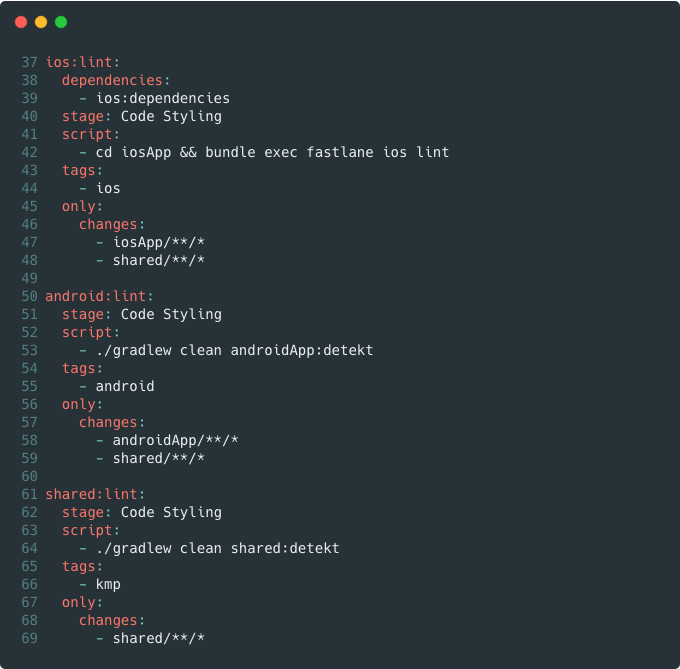
Here you can find the commit on GitLab
Lastly, we add another stage for the tests. Following the same logic, we define three jobs to run the unit tests for iOS, Android and the shared library using the commands from a previous post on how to run unit tests. Each of these jobs will be dependent on the respective linting job and follow the same rules for when they should be executed.
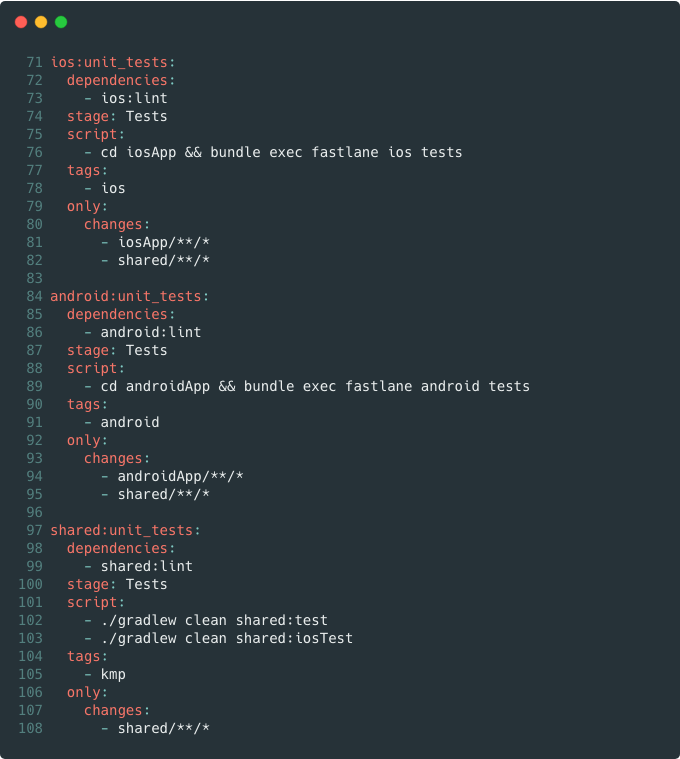
Here you can find the commit on GitLab
Now, if you make a change on the iOS part, only the iOS-related jobs will be triggered and the same happens with the Android. In case of a change on the shared library all the jobs will be triggered.

You can find the whole
gitlab-ci.ymlon the GitLab repo
Wrap up
To sum up, in this article I’ve tried to record the steps on how to setup a GitLab CI pipeline that will run the code styling and unit test jobs for a Kotlin Native project that contains an iOS app, an Android app and a shared library.
With this implementation in place, you can rest assured that GitLab will run these jobs every time a new piece of code is added to the repo, while you can focus on the implementation of new features.
Furthermore, the addition of the CI jobs makes this project a potential template that can be used as a base for other projects to be built on top of it.
Of course, the current implementation can be further extended to run only on pull requests or to build the apps and upload the builds to AppCenter, TestFlight or Google Play, but this is a topic for another post!
Thanks for reading! If you found this post useful, consider buying me a coffee to support the blog. For questions or comments, feel free to reach out on X!
Until next time!
